How to Bypass Ballast for LED Retrofit Kit Installation Guide?

Time:2026-06-03 Author:Oliver
0%

Upgrading to LED lighting offers numerous benefits, including energy efficiency and longer lifespan. However, many users face technical challenges during installation. One common issue is understanding how to bypass ballast for LED retrofit kit installation. This step is critical for ensuring optimal performance of your new lights.

Ballasts are used in traditional fluorescent fixtures to regulate current. When switching to LED, the ballast may become obsolete. Removing it can improve energy usage and enhance light quality. Nevertheless, some users might hesitate, fearing damage to the existing setup. This uncertainty can lead to mistakes or unsafe conditions.

In this guide, you'll gain insights into safely bypassing the ballast. Clear instructions will help you navigate the installation process. However, take your time and double-check each step. Mistakes can occur if you're not careful. Remember, understanding how to bypass ballast for LED retrofit kit installation is essential for achieving the desired results.

How to Bypass Ballast for LED Retrofit Kit Installation Guide?

Understanding the Role of Ballasts in Traditional Lighting Systems

Ballasts play a crucial role in traditional lighting systems, particularly with fluorescent and HID lamps. They regulate the current flowing through the lamp, ensuring it operates efficiently. This component helps start the lamp and maintains a steady light output. Without a ballast, these lamps would flicker or not light up at all.

When retrofitting to LED technology, the ballast often becomes obsolete. Many LEDs can operate directly on line voltage. However, removing the ballast is essential for optimal performance. In some cases, leaving the ballast in can lead to reduced light output and increased energy consumption. It’s important to assess whether the existing ballast is compatible or if it causes further complications.

Consider that DIY installations can be tricky. Mistakes might happen during the bypass process. It’s wise to double-check wiring and connections. Ignite some caution; working with electricity always poses risks. If unsure, consulting with a professional can prevent mishaps. Understanding these elements can greatly enhance your lighting upgrade experience.

Identifying the Right LED Retrofit Kit for Your Needs

When considering an LED retrofit kit, it's essential to understand your specific lighting needs. Not all LED kits are created equal. According to the U.S. Department of Energy, LED technology can save up to 75% of energy costs compared to traditional incandescent bulbs. However, the effectiveness of an LED retrofit depends on the quality of the kit and its compatibility with your existing fixtures.

Selecting the right retrofit kit involves evaluating lumen output, color temperature, and beam angle. The lighting industry reports that fixtures with higher lumen outputs effectively illuminate spaces without hotspots or shadows. Additionally, color temperature affects the ambiance; warmer temperatures create a cozy feel, while cooler temperatures provide an energized atmosphere. Research highlights that a good beam angle ensures uniform light distribution, enhancing both aesthetics and functionality.

Budget considerations cannot be overlooked. Investing in a high-quality LED retrofit kit may yield long-term savings through reduced energy bills. However, some cheaper options could lead to subpar performance and frequent replacements. As a result, questioning the value proposition of lower-cost kits is essential. It’s clear that careful selection can prevent future regrets and enhance both comfort and efficiency in your space.

Safety Precautions Before Bypassing the Ballast

Before starting the process of bypassing the ballast for an LED retrofit kit, safety should be your top priority. Working with electrical components can be hazardous. Always ensure that the power supply is turned off at the circuit breaker. This prevents accidental shocks or shorts. Use a non-contact voltage tester to confirm the lack of electricity in the wiring. Wearing insulated gloves is also recommended, as they provide an additional layer of protection.

Once you’re ready to proceed, it's vital to gather the right tools. Commonly needed items include wire strippers, connectors, and electrical tape. Pay attention to the wiring specifications of your LED retrofit kit. A misunderstanding here could lead to poor connections or malfunctioning lights. Keep your workspace organized, as clutter can lead to mistakes.

In the process, be cautious about the old ballast. It might show signs of wear and tear. Inspect it for any burnt or damaged components. If you're unsure about the connections, consult a professional. It’s okay to ask for help when needed. Sometimes, cutting corners can lead to bigger problems down the road. Taking the time to ensure everything is done correctly can save you future headaches.

Step-by-Step Process for Bypassing the Ballast

When retrofitting your lighting with an LED kit, knowing how to bypass the ballast is essential. This step can maximize efficiency and prolong the lifespan of your new lights. Begin by turning off the power at the circuit breaker. Confirm the power is off with a voltage tester. Safety is paramount.

Next, remove the cover from the existing fixture. Unclip or unscrew the ballast to access the wiring. Carefully note the wire connections. You will remove the ballast from the circuit. It might be tricky; be prepared to scratch your head if the wires are tangled. Taking a photo can help you remember connections.

Now, you’re ready to connect the LED driver directly to the existing wires. Strip the wire ends and use wire nuts or connectors to secure them. Take your time and double-check your work. Mistakes can lead to flickering lights or even damage. Finally, seal everything back up and restore power. Watch as your new LEDs light up bright and efficient, proving that the effort was worth it.

Final Steps: Testing and Ensuring Proper Functionality

After installing an LED retrofit kit, the next critical stage is testing to ensure proper functionality. Begin by turning on the power supply to the fixtures. Watch carefully for any flickering or unusual sounds. LED lights should illuminate steadily without any interruption. If you encounter issues, double-check your wiring connections. A loose or incorrect connection may cause problems.

Using a multimeter, measure the voltage at each connection point. This ensures that the LEDs are receiving adequate power. If readings are low, reassess your bypass of the ballast. Overlooking this aspect can lead to faulty performance. Pay attention to the ambient conditions; temperature can affect LED performance too.

Finally, let the lights run for at least 15-20 minutes. Observe them during this period. This test phase is crucial. It allows you to spot any potential overheating or color inconsistencies. Be mindful that not all installations go smoothly. Issues may arise unexpectedly, prompting a need for adjustments. This process is an exercise in patience and careful attention to detail.

FAQS

: What is the role of a ballast in traditional lighting systems?

: Ballasts regulate current in fluorescent and HID lamps, ensuring efficient operation and steady light output.

Why might a ballast become obsolete when retrofitting to LED technology?

Many LEDs operate directly on line voltage, making the ballast unnecessary for optimal performance.

What could happen if the ballast is not removed during LED installation?

Keeping the ballast may lead to flickering lights and increased energy consumption.

What are the risks of DIY ballast bypassing?

Mistakes can occur, especially with wiring. Consulting a professional can prevent dangerous mishaps.

How can I ensure the power is off before starting the installation?

Turn off the circuit breaker and use a voltage tester to confirm the power is indeed off.

What steps are involved in bypassing the ballast?

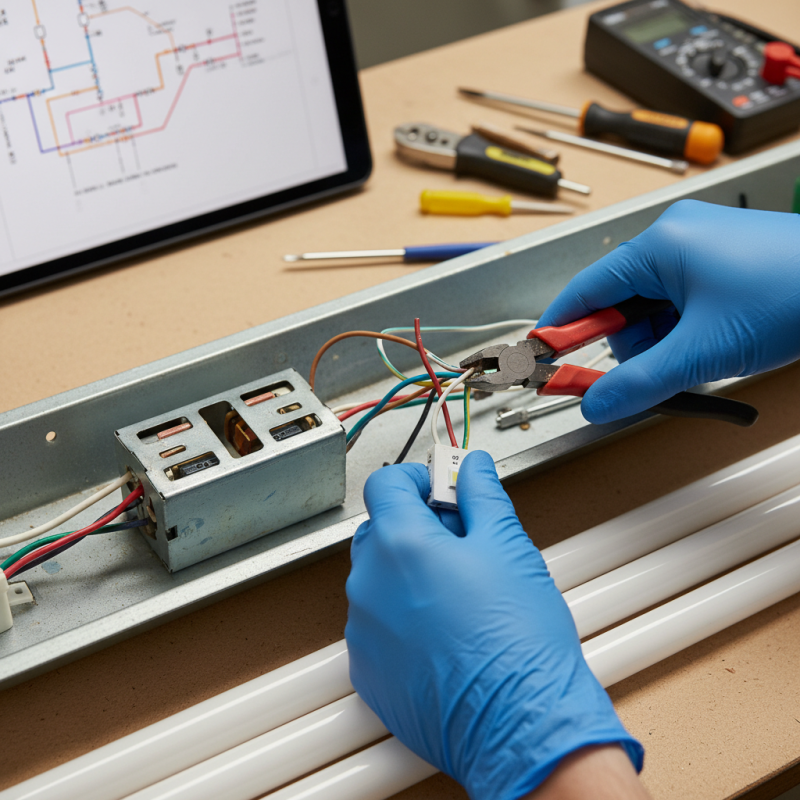
Remove the cover, unclip the ballast, note wiring connections, and connect the LED driver to existing wires.

How can I make sure my new LED lights function properly?

After installation, check for flickering and measure voltage at each connection with a multimeter.

What should I do if I notice issues with the LED lights after installation?

Double-check all wiring connections and reassess the ballast bypass if there are any problems.

Why is it important to observe the LED lights after turning them on?

This helps identify overheating or color inconsistencies, which are critical for proper functionality.

What challenges might I face during the installation process?

Issues can arise unexpectedly, and attention to detail is crucial for a successful upgrade.

Conclusion

The article "How to Bypass Ballast for LED Retrofit Kit Installation Guide" provides a comprehensive overview for individuals looking to upgrade their lighting systems by bypassing existing ballasts. It begins by explaining the role of ballasts in traditional lighting systems and why they may need to be removed for a successful LED retrofit. The guide emphasizes the importance of identifying the right LED retrofit kit to meet specific lighting needs and highlights crucial safety precautions to follow before starting the installation.

In the step-by-step process, readers will learn how to safely bypass the ballast, ensuring that the LED lights operate efficiently. Finally, the article covers the essential testing procedures to confirm the proper functionality of the new lighting setup. Overall, this guide serves as a valuable resource for anyone interested in understanding how to bypass ballast for LED retrofit kit installation, enabling them to achieve a modern and energy-efficient lighting solution.

Oliver

Oliver

Oliver is a seasoned marketing professional with a wealth of expertise in driving brand awareness and engagement. With a deep understanding of our company's product offerings, he consistently delivers high-quality content that enriches our professional blog. His insights not only shed light on......